Deploying sklearn Models via FastAPI and Docker
Deploying machine learning models to production via FastAPI and containerizing them along the way with docker.
Machine learning is one of the hottest topics in the tech-industry right now. Basically every day new breakthroughs are reported in the field of computer vision, natural language processing, knowledge processing, and many more.
Usually, machine learning projects start out by gathering and analyzing the data. A very convenient technology many data scientists and machine learning engineers leverage are Jupyter Notebooks to perform exploratory data analysis.
After having gotten enough insight into the available data, and maybe additionally having done small experiments already, it's time to set up an ML pipeline to train our model on all the available data, most likely on more powerful hardware.
After some training, testing and evaluation, it's then time to put the model into production. As the trained and tuned model will mostly be accessed by other services in our application infrastructure, making it available as an API seems to be a natural choice.
That's why we are going to check out how we can deploy a trained scikit-learn model via FastAPI and Docker. By containerizing our ML model, and it's serving API, we make it easily usable by anyone in our application engineering team, as well as easily deployable on a wide variety of production infrastructure environments.
The Model
In order to keep it simple for this article, we are going to create ourselves a little dummy classification problem, which we are going to tackle with sklearn.
from sklearn.datasets import make_blobs
from sklearn.model_selection import train_test_split
from sklearn.ensemble import RandomForestClassifier
from joblib import dump

X, y = make_blobs(n_samples=500, centers=3, n_features=2, random_state=12)
The code above loads up all the necessary libraries and creates the dummy classification data we can see below. We can fairly easily spot the different clusters, although we'd not expect 100% accuracy for a Random Forest classifier as there are some outliers too, making the boundary between the clusters more blurry.

Next up, we split our data into training and test data, fit our classifier on the training data and evaluate its performance on the test set.
x_train, x_test, y_train, y_test = train_test_split(X, y, test_size=0.2, random_state=42, shuffle=True)

clf = RandomForestClassifier(max_depth=2, random_state=42)
clf.fit(x_train, y_train)

clf.score(x_test, y_test) # 0.94
After our quite intensive evaluation of the model (😉), we can proceed to save it to disk via joblib
dump(clf, 'final_model.joblib')The API
Having our chosen model saved to disk, it's time to set up FastAPI to serve it for other services to use.
from fastapi import FastAPI
from pydantic import BaseModel
from joblib import load


class DataPointDTO(BaseModel):
    x: float
    y: float

class PredictionDTO(BaseModel):
    label: int
    probs: dict


app = FastAPI(title="My sklearn API")

@app.on_event("startup")
def load_model():
    app.model = load("final_model.joblib")

@app.post("/classify", response_model=PredictionDTO)
def classify(data_info: DataPointDTO):
    prediction = app.model.predict([[data_info.y, data_info.y]])[0]
    probs = dict(enumerate(app.model.predict_proba([[data_info.y, data_info.y]])[0]))

    return PredictionDTO(label=prediction, probs=probs)
We import joblib, pydantic and fastapi itself. Additionally, we create 2 data transfer classes which allow us to retrieve a classification request and return our results in a structured way.
Upon startup, we load the previously saved model into memory for later usage.
The only thing left is to define a /classify endpoint which takes a DataPointDTO as input, predicts the class for the given values and returns a PredictionDTO as output to the client.
Swagger & Redoc
FastAPI is not only, as the name implies, tailored to be specifically used as a very fast REST API, it also conveniently includes automatically generated Swagger & Redoc OpenAPI compatible documentation.
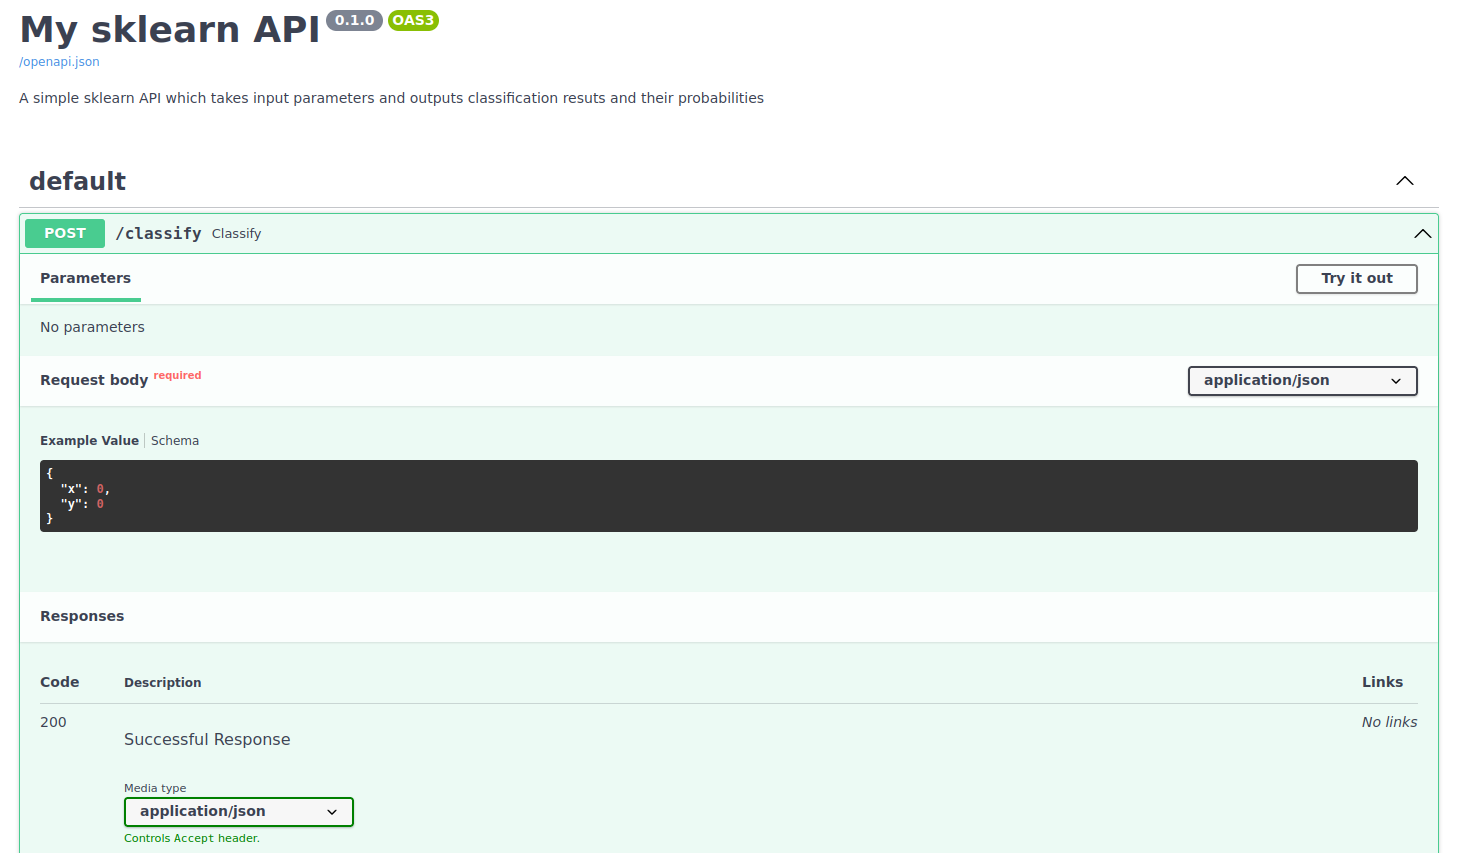
After we have fired up our development server successfully, we can visit the /docs or /redoc endpoint to have a look at the generated documentation. Neatly and without any manual effort, everyone using our API can get all the information on what is needed to trigger predictions.
The Docker Build
Almost there, the third and last step is to fill the Dockerfile with build instructions on how our container should be composed.
FROM python:3.8-slim-buster

WORKDIR /app

COPY ./requirements.txt /app/
RUN pip install --no-cache-dir --upgrade -r /app/requirements.txt

COPY ./final_model.joblib /app/
COPY ./main.py /app/

CMD ["uvicorn", "main:app", "--host", "0.0.0.0", "--port", "80"]
We start out from a slimmed down standard python-3.8 image and set the working directory to /app in order to not interfere with the other standard linux directories in the image.
Generating the requirements.txt
In order to be able to proceed with the next step, namely copying over the requirements.txt file, we first have to generate it!
In case we used pip to set up our environment, we can generate such a file via the pip freeze command.
pip freeze | grep -E "fastapi|joblib|pydantic|scikit-learn|uvicorn" > requirements.txtIf we used conda, we can generate it via conda list --export.
conda list --export | grep -E "fastapi|joblib|pydantic|scikit-learn|uvicorn" | sed -E "s/(.*)=(.*)=.*$/\1==\2/" > requirements.txtIn both cases, we don't want to just blindly require every package installed on our system, but rather slim the list down to only those packages we need, leaving all the other packages versions as system defaults.
Having that set, we can proceed by installing the required packages according to the generated requirements.txt file in our container and copy over the saved model as well as our python FastAPI code.
As a last step, we obviously need to instruct docker to run our application via the uvicorn ASGI web server implementation.
Having the Dockerfile configured, we can proceed building the container. It's advisable to tag the image in one go in order to give it a clear name and version instead of relying on the docker generated container id. After that, we might opt to push the container to dockerhub or our own container registry.
docker build --tag my-name/my-sklearn-api-service:latest .
docker push my-name/my-sklearn-api-service:latest
Verifying the build
In order to verify that our built container works as expected, we can fire it up and call our /classify endpoint with some data we'd like to have a prediction for.
docker run -d -p 8000:80 my-name/my-sklearn-api-service:latest

curl -X POST 'http://localhost:8000/classify' \
	--header 'Content-Type: application/json' \
	--data-raw '{
    	"x": -7,
    	"y": 4
	}'
As we receive the response below from our container, we successfully verified that our model API works as expected.
{
    "label": 0,
    "probs": {
        "0": 0.6850267844212503,
        "1": 0.2832239256850023,
        "2": 0.031749289893747576
    }
}
Congratulations!
You just created a containerized machine learning “microservice” utilizing sklearn, FastAPI and Docker.